


CSS Gamepad API Visual Debugging With CSS Layers
Description
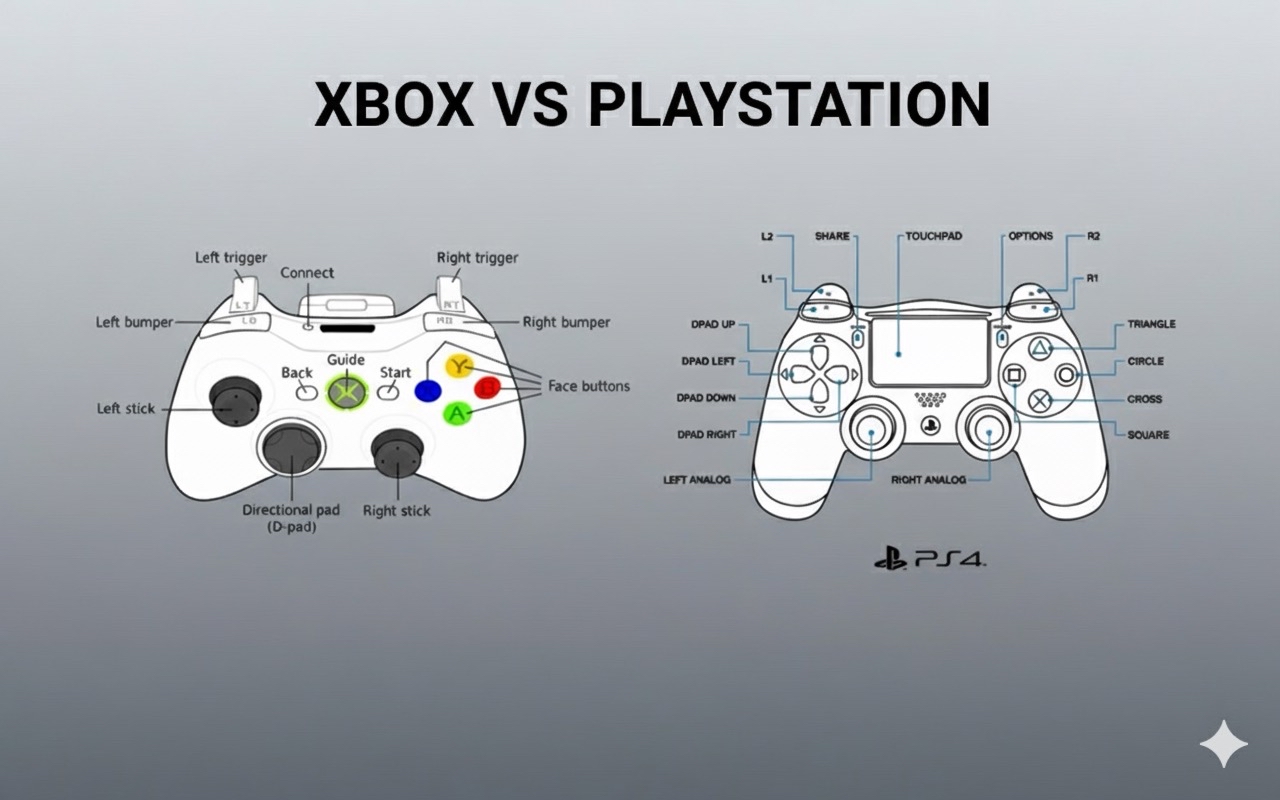
When you plug in a controller, you mash buttons, move the sticks, pull the triggers… and as a developer, you see none of it. The browser’s picking it up, sure, but unless you’re logging numbers in the console, it’s invisible. That’s the headache with the Gamepad API.
It’s been around for years, and it’s actually pretty powerful. You can read buttons, sticks, triggers, the works. But most people don’t touch it. Why? Because there’s no feedback. No panel in developer tools. No clear way to know if the controller’s even doing what you think. It feels like flying blind.
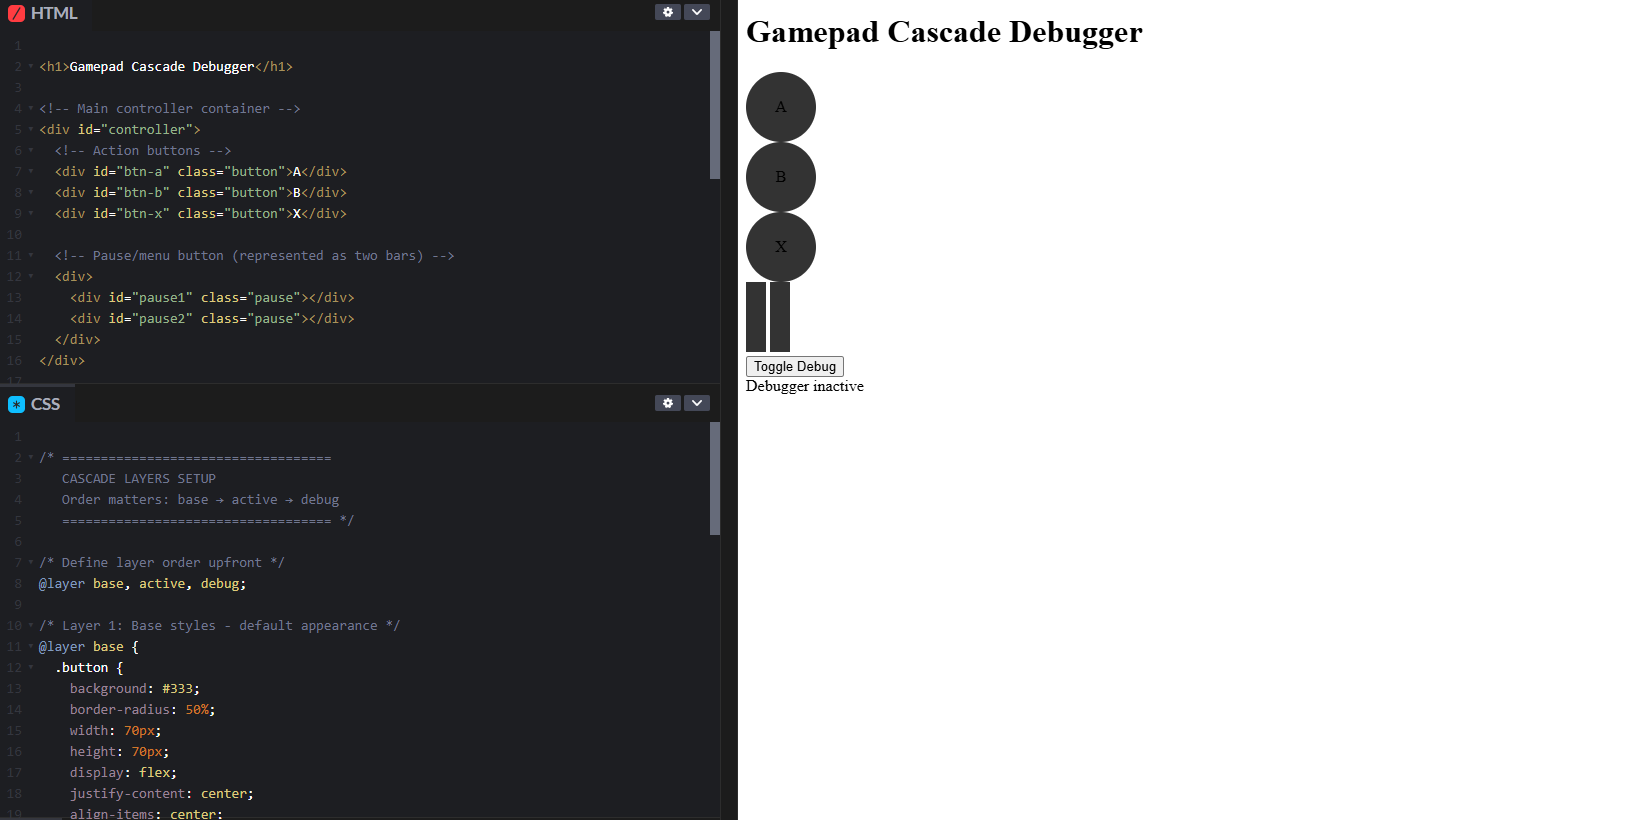
That bugged me enough to build a little tool: Gamepad Cascade Debugger. Instead of staring at console output, you get a live, interactive view of the controller. Press something and it reacts on the screen. And with CSS Cascade Layers, the styles stay organized, so it’s cleaner to debug.
In this post, I’ll show you why debugging controllers is such a pain, how CSS helps clean it up, and how you can build a reusable visual debugger for your own projects.
Even if you are able to log them all, you’ll quickly end up with unreadable console spam. For example:
[0,0,1,0,0,0.5,0,...]
[0,0,0,0,1,0,0,...]
[0,0,1,0,0,0,0,...]
Can you tell what button was pressed? Maybe, but only after straining your eyes and missing a few inputs. So, no, debugging doesn’t come easily when it comes to reading inputs.
Problem 3: Lack Of Structure
Even if you throw together a quick visualizer, styles can quickly get messy. Default, active, and debug states can overlap, and without a clear structure, your CSS becomes brittle and hard to extend.
CSS Cascade Layers can help. They group styles into “layers” that are ordered by priority, so you stop fighting specificity and guessing, “Why isn’t my debug style showing?” Instead, you maintain separate concerns:
- Base: The controller’s standard, initial appearance.
- Active: Highlights for pressed buttons and moved sticks.
- Debug: Overlays for developers (e.g., numeric readouts, guides, and so on).
If we were to define layers in CSS according to this, we’d have:
/* lowest to highest priority */
@layer base, active, debug;

@layer base {
  /* ... */
}

@layer active {
  /* ... */
}

@layer debug {
  /* ... */
}
Because each layer stacks predictably, you always know which rules win. That predictability makes debugging not just easier, but actually manageable.
We’ve covered the problem (invisible, messy input) and the approach (a visual debugger built with Cascade Layers). Now we’ll walk through the step-by-step process to build the debugger.
The Debugger Concept
The easiest way to make hidden input visible is to just draw it on the screen. That’s what this debugger does. Buttons, triggers, and joysticks all get a visual.
- Press
A: A circle lights up. - Nudge the stick: The circle slides around.
- Pull a trigger halfway: A bar fills halfway.
Now you’re not staring at 0s and 1s, but actually watching the controller react live.
Of course, once you start piling on states like default, pressed, debug info, maybe even a recording mode, the CSS starts getting larger and more complex. That’s where cascade layers come in handy. Here’s a stripped-down example:
@layer base {
  .button {
    background: #222;
    border-radius: 50%;
    width: 40px;
    height: 40px;
  }
}

@layer active {
  .button.pressed {
    background: #0f0; /* bright green */
  }
}

@layer debug {
  .button::after {
    content: attr(data-value);
    font-size: 12px;
    color: #fff;
  }
}
The layer order matters: base → active → debug.
basedraws the controller.activehandles pressed states.debugthrows on overlays.
Breaking it up like this means you’re not fighting weird specificity wars. Each layer has its place, and you always know what wins.
Building It Out
Let’s get something on screen first. It doesn’t need to look good — just needs to exist so we have something to work with.
Gamepad Cascade Debugger


  A
  B
  X


<button id="toggle">Toggle Debug</button>


Debugger inactive

<script src="script.js"></script>
That’s literally just boxes. Not exciting yet, but it gives us handles to grab later with CSS and JavaScript.
Okay, I’m using cascade layers here because it keeps stuff organized once you add more states. Here’s a rough pass:
/* ===================================
   CASCADE LAYERS SETUP
   Order matters: base → active → debug
   =================================== */

/* Define layer order upfront */
@layer base, active, debug;

/* Layer 1: Base styles - default appearance */
@layer base {
  .button {
    background: #333;
    border-radius: 50%;
    width: 70px;
    height: 70px;
    display: flex;
    justify-content: center;
    align-items: center;
  }

  .pause {
    width: 20px;
    height: 70px;
    background: #333;
    display: inline-block;
  }
}

/* Layer 2: Active states - handles pressed buttons */
@layer active {
  .button.active {
    background: #0f0; /* Bright green when pressed */
    transform: scale(1.1); /* Slightly enlarges the button */
  }

  .pause.active {
    background: #0f0;
    transform: scaleY(1.1); /* Stretches vertically when pressed */
  }
}

/* Layer 3: Debug overlays - developer info */
@layer debug {
  .button::after {
    content: attr(data-value); /* Shows the numeric value */
    font-size: 12px;
    color: #fff;
  }
}
The beauty of this approach is that each layer has a clear purpose. The base layer can never override active, and active can never override debug, regardless of specificity. This eliminates the CSS specificity wars that usually plague debugging tools.
Now it looks like some clusters are sitting on a dark background. Honestly, not too bad.
Adding the JavaScript
JavaScript time. This is where the controller actually does something. We’ll build this step by step.
Step 1: Set Up State Management
First, we need variables to track the debugger’s state:
// ===================================
// STATE MANAGEMENT
// ===================================

let running = false; // Tracks whether the debugger is active
let rafId; // Stores the requestAnimationFrame ID for cancellation
These variables control the animation loop that continuously reads gamepad input.
Step 2: Grab DOM References
Next, we get references to all the HTML elements we’ll be updating:
// ===================================
// DOM ELEMENT REFERENCES
// ===================================

const btnA = document.getElementById("btn-a");
const btnB = document.getElementById("btn-b");
const btnX = document.getElementById("btn-x");
const pause1 = document.getElementById("pause1");
const pause2 = document.getElementById("pause2");
const status = document.getElementById("status");
Storing these references up front is more efficient than querying the DOM repeatedly.
Step 3: Add Keyboard Fallback
For testing without a physical controller, we’ll map keyboard keys to buttons:
// ===================================
// KEYBOARD FALLBACK (for testing without a controller)
// ===================================

const keyMap = {
  "a": btnA,
  "b": btnB,
  "x": btnX,
  "p": [pause1, pause2] // 'p' key controls both pause bars
};
This lets us test the UI by pressing keys on a keyboard.
Step 4: Create The Main Update Loop
Here’s where the magic happens. This function runs continuously and reads gamepad state:
// ===================================
// MAIN GAMEPAD UPDATE LOOP
// ===================================

function updateGamepad() {
  // Get all connected gamepads
  const gamepads = navigator.getGamepads();
  if (!gamepads) return;

  // Use the first connected gamepad
  const gp = gamepads[0];

  if (gp) {
    // Update button states by toggling the "active" class
    btnA.classList.toggle("active", gp.buttons[0].pressed);
    btnB.classList.toggle("active", gp.buttons[1].pressed);
    btnX.classList.toggle("active", gp.buttons[2].pressed);

    // Handle pause button (button index 9 on most controllers)
    const pausePressed = gp.buttons[9].pressed;
    pause1.classList.toggle("active", pausePressed);
    pause2.classList.toggle("active", pausePressed);

    // Build a list of currently pressed button


 United States
