How to create a custom ringtone for your iPhone
Description
<body>
The iPhone comes with a number of ringtones you can use for calls and text notifications, and even added a lot of new ones in iOS 17. But it’s your iPhone, why not use a custom ringtone that only you have?
You can even set certain ringtones for specific contacts, so you immediately know who it is when they call. For example, you can set a song that’s special to you and your spouse as a ringtone, so when your spouse calls, you’ll hear the song and know immediately who it is.
You can even make a custom ringtone right on your iPhone with GarageBand, or use your Mac and edit it in the Music app, as long as you know the steps. Here’s how it works.
How to make custom ringtones on your iPhone
There are a few ways to make a custom ringtone to play on your iPhone, we will discuss each of these methods below.
- You can either create your ringtone in the Music app on your Mac (or PC). Just choose a track you like, edit it so that a 30 second clip, and convert it so it can be added to your ringtones. (Jump to the instructions).
- You can create and edit your ringtone in the GarageBand app directly on your iPhone. (Jump to the instructions).
- You can buy ringtones from Apple. (Jump to the instructions).
Once you have created your 30 second clip you need to add it to your iPhone and assign it to a contact. We discuss how to import your ringtone and how to make it play when a certain contact calls below.
Read on for our complete guide to making your own ringtone and assigning it to a contact on your iPhone.
How make a ringtone from your favourite track on a Mac
The easiest way to create a ringtone from a song you like is using the Music app on your Mac (or PC).
However, you must own the physical song file—streamed songs cannot be made into ringtones. Also, the files must not be copy-protected.
 <button class="lightbox-trigger" type="button" aria-haspopup="dialog" aria-label="Enlarge image: set ringtone duration" data-wp-init="callbacks.initTriggerButton" data-wp-on-async--click="actions.showLightbox" data-wp-style--right="context.imageButtonRight" data-wp-style--top="context.imageButtonTop">
<svg xmlns="http://www.w3.org/2000/svg" width="12" height="12" fill="none" viewbox="0 0 12 12">
<path fill="#fff" d="M2 0a2 2 0 0 0-2 2v2h1.5V2a.5.5 0 0 1 .5-.5h2V0H2Zm2 10.5H2a.5.5 0 0 1-.5-.5V8H0v2a2 2 0 0 0 2 2h2v-1.5ZM8 12v-1.5h2a.5.5 0 0 0 .5-.5V8H12v2a2 2 0 0 1-2 2H8Zm2-12a2 2 0 0 1 2 2v2h-1.5V2a.5.5 0 0 0-.5-.5H8V0h2Z"></path>
</svg>
</button></figure>
IDG
Follow these steps to create your ringtone for iPhone:
- Launch the Music app.
- Go to your music library and find the song you want to make into a ringtone. Play the song and keep an eye on the elapsed time at the top of the app. Note the time stamp where you want the ringtone to start, then note where you want it to end. (Note: Ringtones cannot be longer than 30 seconds.)
- Right-click on the song and in the pop-up menu, select Get Info.
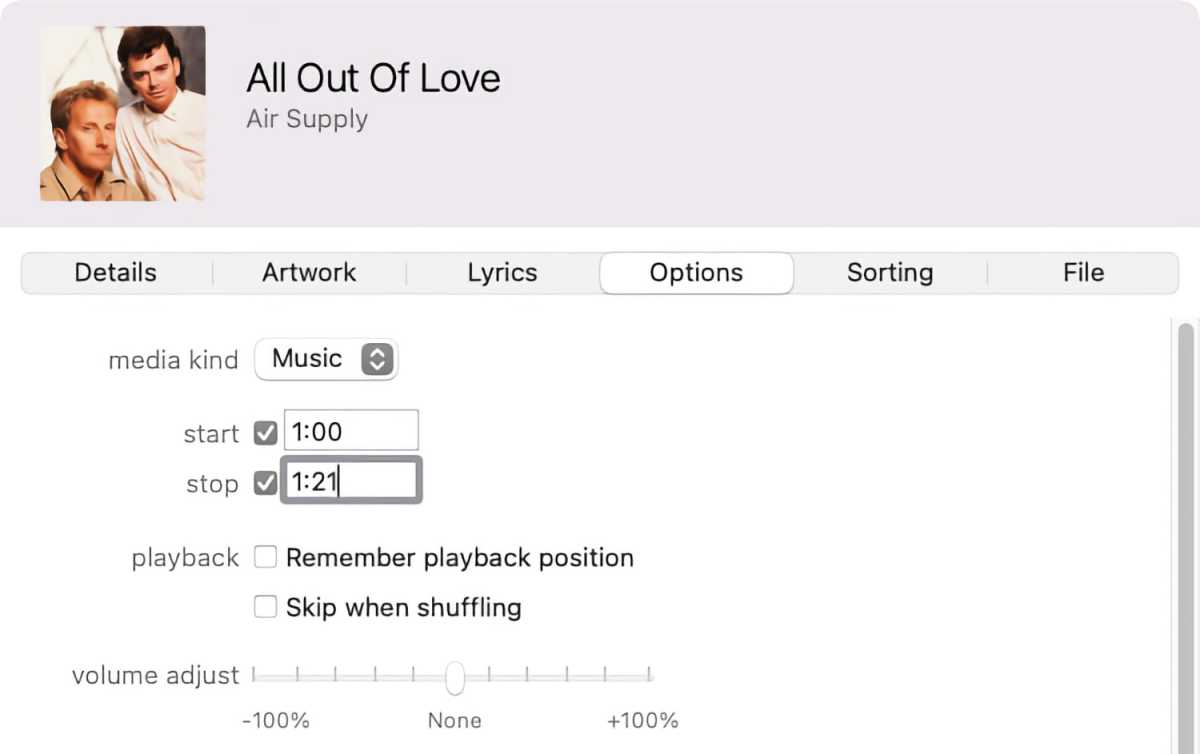
- A window with the details of the song file will appear. Click Options.
- In Options, there are timecodes for Start and Stop. Check the Start checkbox and enter the starting time from step 2. Then check the Stop box and enter the end time. Click OK.
- Select the file, and then click on the File menu and select Convert > Create AAC version. (If the only option you see is Create MP3 version, select that.)
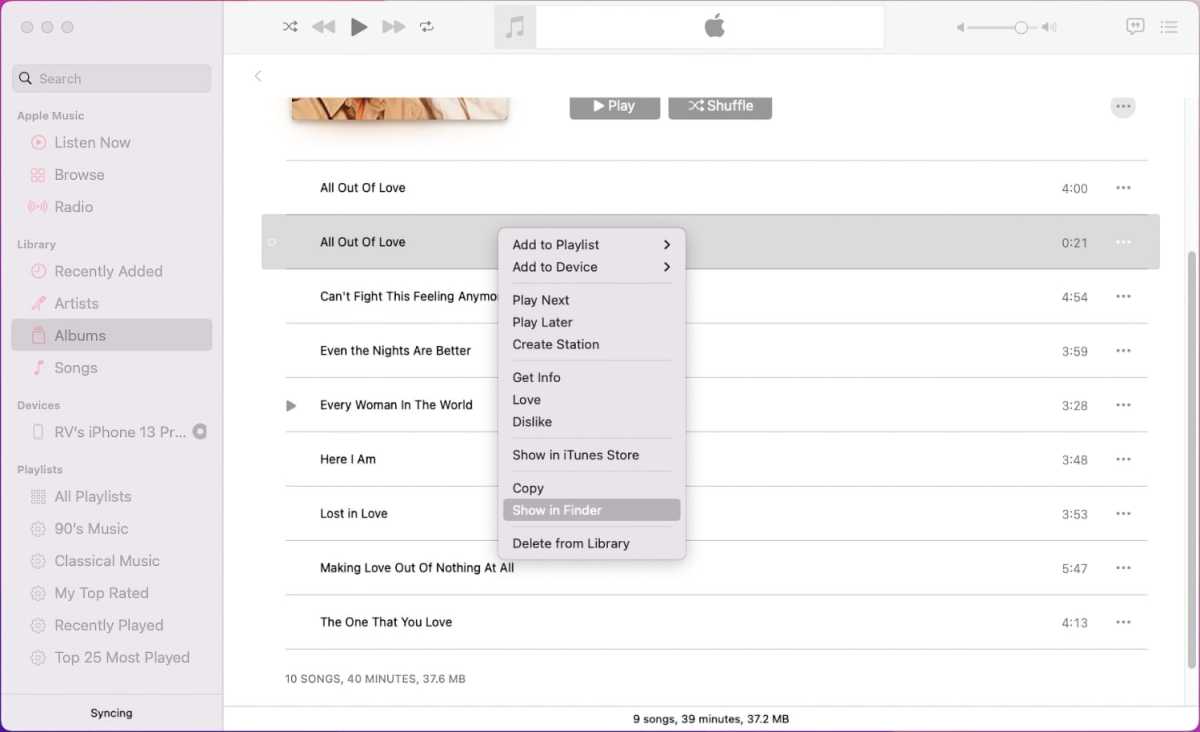
- A new copy of your song file will appear under the original. Right-click on it and select Show in Finder. (If you can’t see the copy of the song below the one you just converted click on Songs on the left, and search for that track).
- A Finder window with the song file should appear on your desktop. Look at the file’s extension (the extension appears after the file name and a period “.”). If you don’t see the extension, right-click on the file, select Get Info, and then look for the Name & Extension section. Then do one of the following:
- If the extension is .m4a click on the name and change the extension to .m4r. Confirm you want to change the extension.
- If the extension is .mp3, the file needs to be converted to .m4a. Open the file in QuickTime Player, which is in your Applications folder. Then in QuickTime Player, click on the File menu and select Export As > Audio Only. Name the file, choose a place to save it, then click Save. Then change the extension of the newly exported file to .m4r.
Now you have a suitable ringtone file, and you just need to install it on your iPhone, read on for how to do that.
 <button class="lightbox-trigger" type="button" aria-haspopup="dialog" aria-label="Enlarge image: Apple Music show in finder" data-wp-init="callbacks.initTriggerButton" data-wp-on-async--click="actions.showLightbox" data-wp-style--right="context.imageButtonRight" data-wp-style--top="context.imageButtonTop">
<svg xmlns="http://www.w3.org/2000/svg" width="12" height="12" fill="none" viewbox="0 0 12 12">
<path fill="#fff" d="M2 0a2 2 0 0 0-2 2v2h1.5V2a.5.5 0 0 1 .5-.5h2V0H2Zm2 10.5H2a.5.5 0 0 1-.5-.5V8H0v2a2 2 0 0 0 2 2h2v-1.5ZM8 12v-1.5h2a.5.5 0 0 0 .5-.5V8H12v2a2 2 0 0 1-2 2H8Zm2-12a2 2 0 0 1 2 2v2h-1.5V2a.5.5 0 0 0-.5-.5H8V0h2Z"></path>
</svg>
</button></figure>
IDG
How to get the ringtone you created on to your iPhone
If you used a Mac, as per the steps above, to create your ringtone, here’s how to get that on your iPhone:
- Connect your iPhone to your Mac via USB.
- Open a Finder window (press ⌘-N on the desktop).
- In the sidebar under Locations, you should find your iPhone. Select it.
- Find your ringtone file (the one with the .m4r extension), and drag it over to the Finder window that has y


