


Apple Preview review: A near-perfect PDF reader with limited editing tools
Description
At a glance
Expert's Rating
Pros
- Pre-installed on all Macs, iPhones, and iPads for free
- Automatically launches when viewing supported files
- Minimalistic user interface that won’t overwhelm
- Wide range of handy tools for image and document manipulation
Cons
- Doesn’t support text editing in PDF files
- Limited functionality on iOS and iPadOS
- Image crop button requires an unintuitive workaround on macOS
Our Verdict
While Apple Preview isn’t designed to replace your image or PDF editor, it still offers some power-user features, including image export. We wonder if Apple will eventually introduce advanced document editing tools.
Price When Reviewed
This value will show the geolocated pricing text for product undefined
Best Pricing Today
When you buy an Apple product, you’re not only investing in its premium hardware and long lifespan, but also the slew of exclusive apps it bundles for free. The Apple Preview app is the default document and image viewer on macOS, iOS, and iPadOS, and its full potential often goes unnoticed. While Apple Preview may appear as a basic file viewer, it actually packs a ton of useful features—beyond just viewing photos and PDFs.
Find out how Apple Preview compares to the alternatives in our Best PDF Editor for Mac round-up.
Apple Preview: Mac features
Much like some other Apple apps (such as the iWork suite), launching Preview on macOS opens the Finder. Through it, you can browse through your folders to locate the file you would like to view. It’s a pretty straightforward approach.
Alternatively, you could just open a compatible file directly from Finder and avoid launching the Preview app altogether. Considering that it’s the default image and PDF viewer on macOS, supported files should automatically populate in it whenever you double-click on them.
 <button class="lightbox-trigger" type="button">
<svg fill="none" height="12" viewBox="0 0 12 12" width="12" xmlns="http://www.w3.org/2000/svg">
<path d="M2 0a2 2 0 0 0-2 2v2h1.5V2a.5.5 0 0 1 .5-.5h2V0H2Zm2 10.5H2a.5.5 0 0 1-.5-.5V8H0v2a2 2 0 0 0 2 2h2v-1.5ZM8 12v-1.5h2a.5.5 0 0 0 .5-.5V8H12v2a2 2 0 0 1-2 2H8Zm2-12a2 2 0 0 1 2 2v2h-1.5V2a.5.5 0 0 0-.5-.5H8V0h2Z" fill="#fff"></path>
</svg>
</button></figure>
Foundry
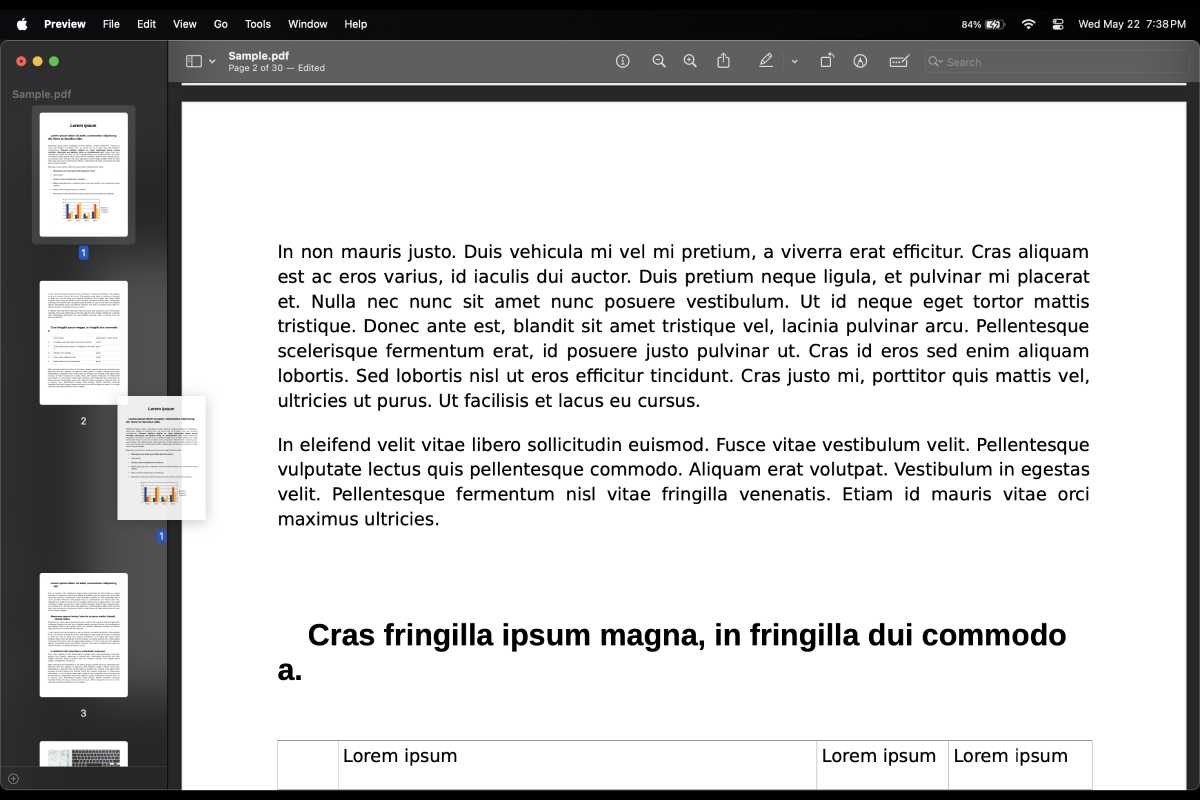
Whether you’re viewing an image or a PDF document, you will find a toolbar towards the screen’s top. It lets you view the file’s details, zoom in or out, share the file, fill an included form, or mark up the file.
Clicking the Markup button reveals yet another toolbar with a wide range of relevant features. These include tools for selection, doodling, inserting shapes or sticky notes, signing, and typing text.
Expectedly, the Markup tools are easily customizable, allowing you to control the color and size of a shape or text box. Similarly, you get to pick between multiple fonts when typing. There is an autofill helper too, read about that here: How to take advantage of Preview’s form-filling helper.
So, Apple Preview isn’t just a vanilla file viewer. It enables users to easily annotate images and documents, making it an excellent college companion. Perhaps the biggest drawback here is the lack of an advanced editor that can tweak the content’s fundamentals.
With the Preview app, you’re mostly limited to adding new elements on top of the existing ones. Consequently, you can’t edit the text of a PDF file. The software doesn’t offer a full-fledged photo editor, either (we have the best photo editors here).
 <button class="lightbox-trigger" type="button">
<svg fill="none" height="12" viewBox="0 0 12 12" width="12" xmlns="http://www.w3.org/2000/svg">
<path d="M2 0a2 2 0 0 0-2 2v2h1.5V2a.5.5 0 0 1 .5-.5h2V0H2Zm2 10.5H2a.5.5 0 0 1-.5-.5V8H0v2a2 2 0 0 0 2 2h2v-1.5ZM8 12v-1.5h2a.5.5 0 0 0 .5-.5V8H12v2a2 2 0 0 1-2 2H8Zm2-12a2 2 0 0 1 2 2v2h-1.5V2a.5.5 0 0 0-.5-.5H8V0h2Z" fill="#fff"></path>
</svg>
</button></figure>
Foundry
While Apple Preview isn’t designed to replace your image or PDF editor, it still offers some power-user features. So, for example, through the menubar’s Tools button, you can reveal some more advanced image controls, such as granular resizing, color adjustments, automatic background removal, and more. Meanwhile, the File menu includes a useful Export button that enables you to choose the output’s quality and file format. This allows you to convert the image to HEIC, JPEG, PDF, PNG, TIFF, and more.
Similarly, when viewing a PDF file in Apple Preview, you can easily reorder or delete its pages using the sidebar. Through this feature, those receiving large documents can easily get rid of irrelevant fluff and limit the file to the important bits they actually need. And if you choose to export the PDF using Preview, then you can optionally add a password, a Quartz filter, or file restrictions.
Find out more here: How to save a page from a PDF as a separate file, How to easily redact text in a PDF on your Mac. We also cover How to edit a PDF on Mac.
Annoyances on macOS
While my experience using Apple Preview on my Mac has been positive for the most part, there are certain annoyances that I hope the company would patch down the road.
For starters, I find the basic PDF editor too restrictive at times. Sure, I can insert shapes and text on top of the document. However, I can’t actually integrate these into it and move the PDF’s content to accommodate the new additions. Similarly, there’s seemingly no way to selectively remove content from a PDF, and I’m bound to delete entire pages.
 <button class="lightbox-trigger" type="button">
<svg fill="none" height="12" viewBox="0 0 12 12" width="12" xmlns="http://www.w3.org/2000/svg">
<path d="M2 0a2 2 0 0 0-2 2v2h1.5V2a.5.5 0 0 1 .5-.5h2V0H2Zm2 10.5H2a.5.5 0 0 1-.5-.5V8H0v2a2 2 0 0 0 2 2h2v-1.5ZM8 12v-1.5h2a.5.5 0 0 0 .5-.5V8H12v2a2 2 0 0 1-2 2H8Zm2-12a2 2 0 0 1 2 2v2h-1.5V2a.5.5 0 0 0-.5-.5H8V0h2Z" fill="#fff"></path>
</svg>
</button></figure>
Foundry
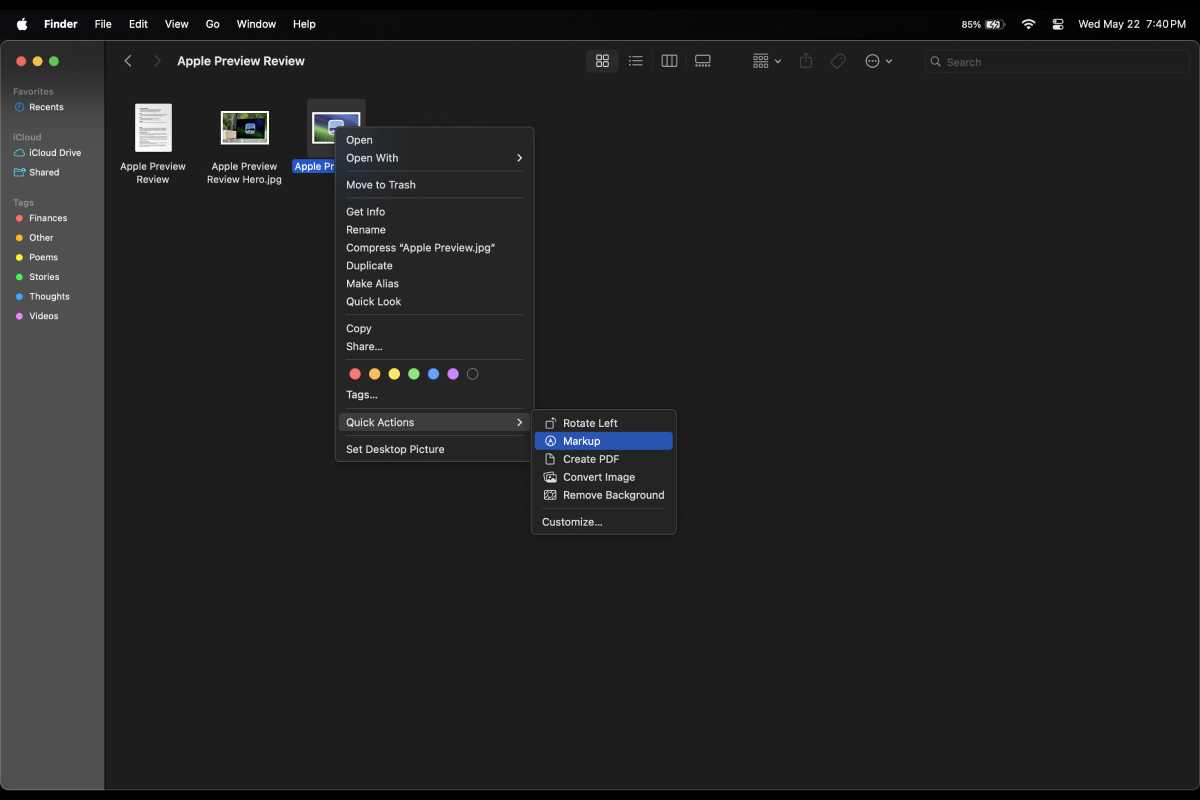
Otherwise, when viewing an image in Preview, you likely won’t find the Crop button in the Markup toolbar by default. To force it to surface, you have to locate the image in Finder, right-click on it, and hit the Markup button under the Quick Actions menu. This will launch a Preview instance with a toolbar that actually features a Crop button. Regularly opening an image in Finder si


 United States
